library(ggplot2)
p <-
  ggplot(mpg, aes(x = displ, y = hwy, color = cty, shape = drv)) +
  geom_point() +
  facet_grid(~year) +
  labs(
    title = "Fuel efficiency",
    subtitle = paste0("Described for ", nrow(mpg), " cars from 1999 and 2008"),
    caption = "Source: U.S. Environmental Protection Agency",
    x = "Engine Displacement",
    y = "Highway miles per gallon",
    colour = "City miles\nper gallon",
    shape = "Drive train"
  )
p附录 C — ggplot2 styling 设置
在 ggplot2 中,主题系统负责图表外观中诸多非数据相关的方面,涵盖从面板、坐标轴、标题到图例的所有元素。本文将带您逐步掌握主题系统的重要组成部分。 我们将从完整主题开始,深入探讨主题元素及其在图表各部分的应用,最后分享实用技巧(包括如何编写自定义主题函数)。在正式讲解主题之前,先创建一个能展示多种特性的示例图表。
C.1 内置主题和附加主题
ggplot2中有多个内置主题,包括theme_grey() (default),theme_bw(),theme_linedraw(),theme_light(),theme_dark(),theme_minimal(),theme_classic(),theme_void(),theme_test()。
此外,许多packages也自带了可用于ggplot2的附加主题,例如:
-
cowplot包中的cowplot::theme_cowplot(),避免使用过小的标签,并使用更为简洁的外观。
p + cowplot::theme_cowplot()-1.png)
-
ggthemes包主题包收录了多款主题,这些主题借鉴了其他知名数据可视化平台的设计风格,例如ggthemes::theme_fivethirtyeight()
p + ggthemes::theme_fivethirtyeight()-1.png)
更多的主题可以参看ggplot2 extension gallery,并通过theme标签检索更多的主题包。
这些主题函数中有很多参数可供调整,具体可参看函数的帮助文档。
C.2 主题元素
?theme()帮助文档对每个主题元素均有详细的说明。
当一组相关属性作为主题元素时,ggplot2 提供了 element_*() 函数。
-
element_blank(): 跳过绘制。 -
element_line():绘制坐标轴、网格线和刻度线。 -
element_rect():绘制面板、背景、边框和条带等矩形元素。 -
element_text():调整标题、标签等的文本元素。 -
element_geom():用于设置图层的默认属性。
C.3 theme的剖析
theme()函数拥有大量参数目前它已包含 147 个参数,而 … 符号更掩盖了额外选项的存在,一次性解析起来可能令人望而生畏。死记硬背不是一个好的方式,我们不妨尝试消化这些内容。
theme()函数采用分步处理的方式。主题的大部分功能已被拆分到theme_sub_*()函数家族中。该家族仅提供简易快捷方式。例如theme_sub_axis(title)的参数会填充axis.title元素。
若需重新定义一系列相关设置,使用 theme_sub_*() 函数颇有裨益:
这些函数是
ggplot2 4.00版本中新增的,可以省去很多重复性的前缀,非常好使。简洁性——例如频繁调整左 y 轴时,使用
theme_sub_axis_left(title, text, ticks)比theme(axis.title.y.left, axis.text.y.left, axis.ticks.y.left)更简洁。在于有助于主题管理,在绘制图表时能保持一丝条理。
目前,有如下的theme_sub_xx()系列函数:
-
theme_sub_axis(): Theme specification for all axes. -
theme_sub_axis_x(): Theme specification for both x axes. -
theme_sub_axis_y(): Theme specification for both y axes. -
theme_sub_axis_bottom(): Theme specification for the bottom x axis. -
theme_sub_axis_top(): Theme specification for the top x axis. -
theme_sub_axis_left(): Theme specification for the left y axis. -
theme_sub_axis_right(): Theme specification for the right y axis. -
theme_sub_legend(): Theme specification for the legend. -
theme_sub_panel(): Theme specification for the panels. -
theme_sub_plot(): Theme specification for the whole plot. -
theme_sub_strip(): Theme specification for facet strips.
C.3.1 图形整体调整-theme_sub_plot90
使用theme_sub_plot()函数,我们可以省略参数中的plot.前缀,例如plot.title可直接写为title。
p +
  labs(tag = "A") + # 设置标签已被之后调整
  theme_sub_plot(
    # 调整背景颜色
    background = element_rect(fill = "cornsilk"),

    # 调整标题
    title = element_text(hjust = 0),
    subtitle = element_text(color = "blue"),
    title.position = "plot", # 与图形对齐,"panel"与面板对齐

    # 调整caption
    caption = element_text(hjust = 1),
    caption.position = "plot",

    # 调整tag
    tag.position = "topright",
    tag.location = "panel"
)-1.png)
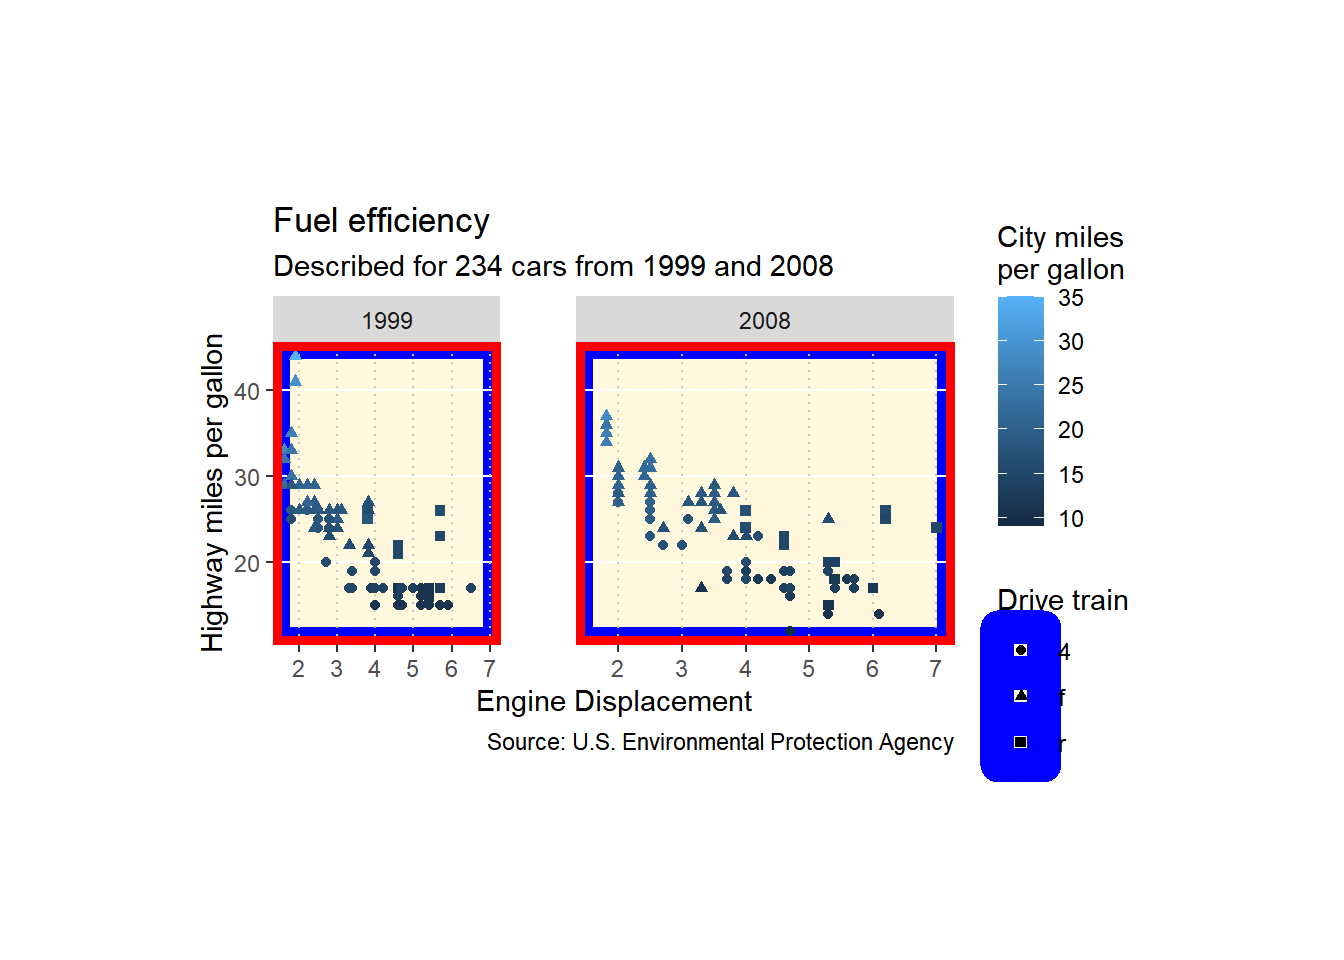
C.3.2 面板调整-theme_sub_panel()
面板的调整主要聚焦于图形的网格线,面板的背景和边框。值得注意的是,面板背景位于数据下方(除非 ontop = TRUE),而面板边框则位于面板之上。下图可清晰展示这一特性——白色网格线在蓝色背景上清晰可见,但在红色边框上则不可见。
p +
  theme_sub_panel(
    # 增加图形面板间隙
    spacing.x = unit(1, "cm"),

    # 调整所有网格
    grid = element_line(color = "grey80"),

    # 将次要网格删除
    grid.minor = element_blank(),

    # 调整主要网格线
    grid.major.x = element_line(linetype = "dotted"),
    grid.major.y = element_line(color = "white"),

    # 调整背景和边框
    background = element_rect(
      fill = "cornsilk",
      color = "blue",
      linewidth = 6
    ),
    border = element_rect(
      color = "red",
      linewidth = 3,
      fill = "black"
    ),

    # 调整面板尺寸,当有多行或多列面板时,需提供对应数量的单位数字
    widths = unit(c(3, 5), "cm"), # 调整两个面板的宽度
    heights = unit(4, "cm")
  )
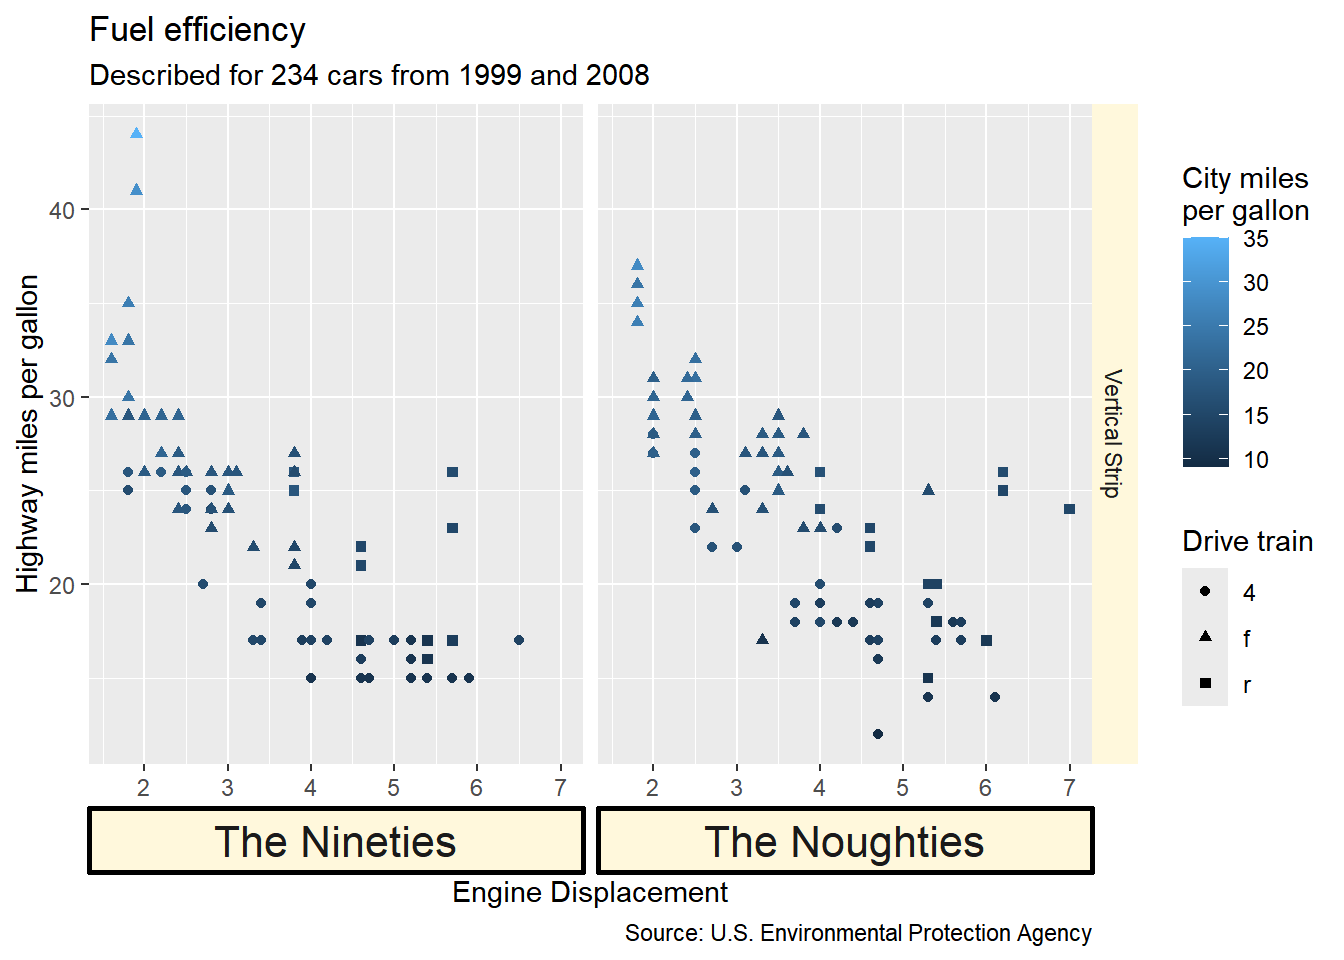
C.3.3 条带-theme_sub_strip()
条带是指分面标签所在的区域。使用theme_sub_strip()函数,我们可以省略参数中的strip.前缀,例如strip.text.x.top可直接写为text.x.top。
# We're including a labeller to showcase formatting
my_labeller <- as_labeller(c(
  `1999` = "The Nineties",
  `2008` = "The Noughties",
  V = "Vertical Strip"
))

p +
  # Using a dummy strip for the vertical direction
  facet_grid("V" ~ year, labeller = my_labeller, switch = "x") +
  theme_sub_strip(
    # 调整条带背景
    background = element_rect(fill = "cornsilk"),
    # 调整水平条带背景
    background.x = element_rect(color = "black", linewidth = 1),
    # 调整水平条带字体
    text.x.bottom = element_text(size = 16),
    placement = "outside", # 将条带放在面板外侧

    clip = "off" # 允许条带内容超出面板边界,默认为"on"
  )
C.3.4 坐标轴-theme_sub_axis_XX()
坐标轴是图表中最重要的组成部分之一,同时也是最复杂的主题元素。使用theme_sub_axis()函数,我们可以省略参数中的axis.前缀,例如axis.title.x.bottom可直接写为title.x.bottom。
theme_sub_axis() 函数可让同时调整所有坐标轴,相应的还有theme_sub_axis_x(),theme_sub_axis_y(),theme_sub_axis_bottom(),theme_sub_axis_top(),theme_sub_axis_left()以及theme_sub_axis_right(),分别用于设置不同位置的坐标轴。C.3.4.1 调整所有坐标轴
p +
theme_sub_axis(line = element_line())-1.png)
C.3.4.2 分别调整x和y轴
p +
  theme_sub_axis_x(line = element_line()) +
theme_sub_axis_y(ticks = element_blank())-1.png)
C.3.4.3 精细调整自坐标轴
p +
  guides(x.sec = "axis", y.sec = "axis") + # Extra axes
  theme_sub_axis_bottom(ticks = element_blank()) +
  theme_sub_axis_top(
    ticks.length = unit(5, "mm"),
    ticks = element_line(color = "red")
  ) +
  theme_sub_axis_left(
    text = element_text(margin = margin_auto(10))
  ) +
  theme_sub_axis_right(
    line = element_line()
)-1.png)
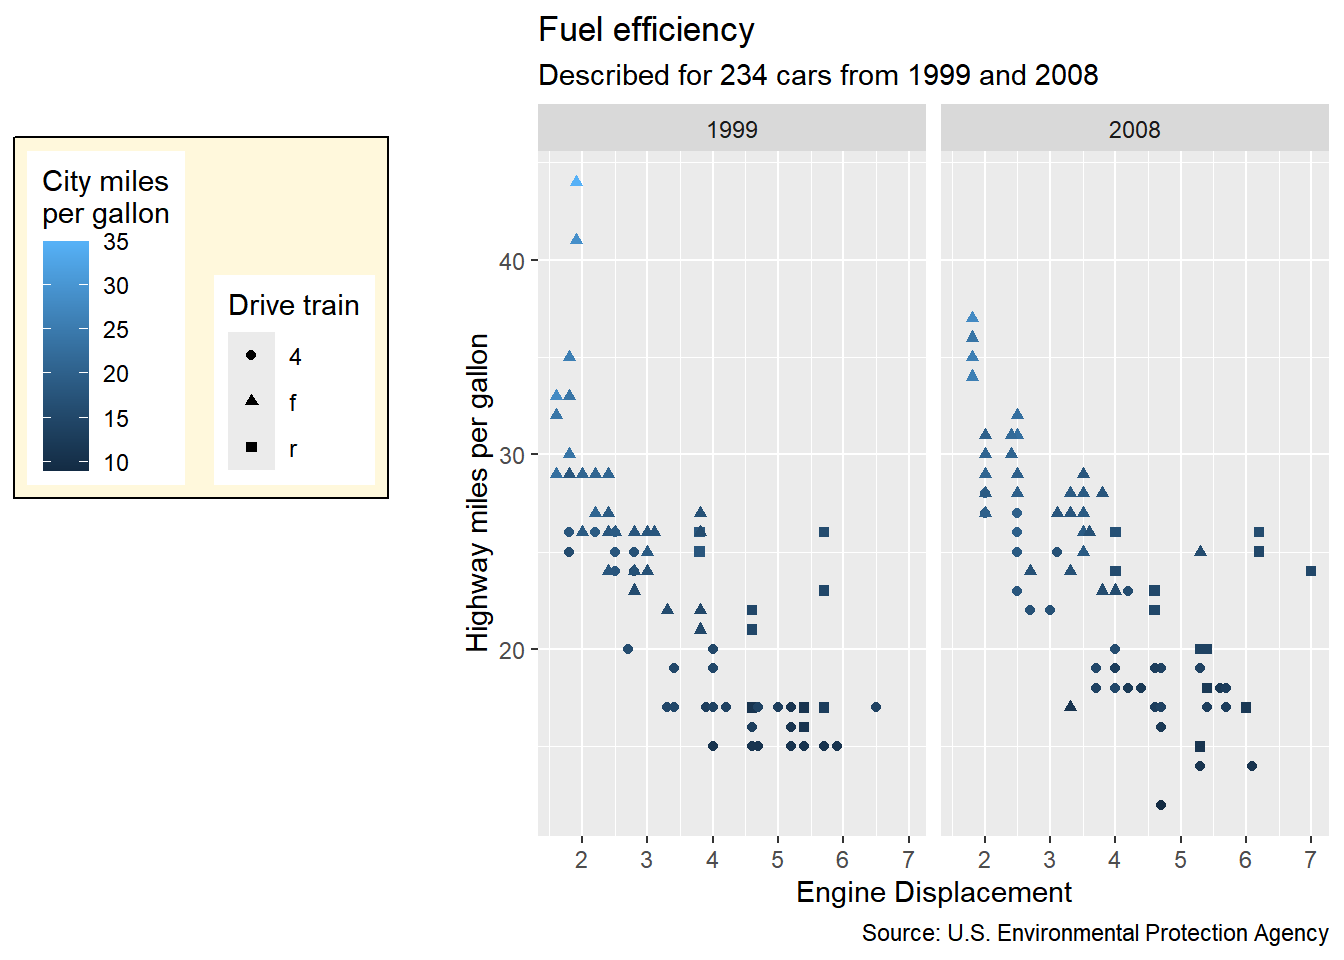
C.3.5 图例-theme_sub_legend()
C.3.5.1 guide box
guide box是存放图例的容器,负责其内容物的放置与排列。
p +
  theme_sub_legend(
    # 显示gudie box
    box.background = element_rect(fill = "cornsilk"),

    # 将图例置于左侧
    position = "left",

    # 调整图例为水平
    box = "horizontal",

    # 上方对齐guide box
    justification = "top",
    # 下方对齐图例
    box.just = "bottom",

    # 调整图例边距和间距
    box.margin = margin_auto(5),
    box.spacing = unit(1, "cm")
  )
图例框可以通过在guides_**()函数中手动指定position参数进行拆分。无法独立调整每个位置的每个框设置,但可单独对齐每个框。
p +
  # 将shape图例调整至左边
  guides(shape = guide_legend(position = "left")) +
  theme_sub_legend(
    # Showing the boxes
    box.background = element_rect(fill = "cornsilk"),
    box.margin = margin_auto(5),

    # Tweaking the justification per position
    justification.left = "top",
    justification.right = "bottom"
)-guide-box-2-1.png)
C.3.5.2 通用的图例指南
guide_legend()、guide_colourbar()和guide_bins()函数可用于创建图例指南。通过调整这些指南的参数,可以实现对图例外观的细粒度控制。
这些设置涉及图例的北京、边距、标签和标题的部局,以及图例键的大小和形状。
C.3.5.2.1 整体图例设置
p +
  theme_sub_legend(
    # 调整图例背景-宽度、颜色等
    background = element_rect(fill = "cornsilk"),
    margin = margin_auto(5, unit = "mm"),

    # 调整图例标题-位置、角度等
    title = element_text(angle = 270),
    title.position = "right",

    # 调整图例标签-大小、颜色等
    text = element_text(color = "red"),
    text.position = "left",

    # 调整图例键-大小、形状等
    key.width = unit(5, "mm"),
    key.height = unit(5, "mm")
)-general-legend-guides-1.png)
TODO: 补充各类图例指南的具体设置
连续型图例设置-
guide_colorbar()离散型图例设置-
guide_legend()分箱图例设置-
guide_bins()
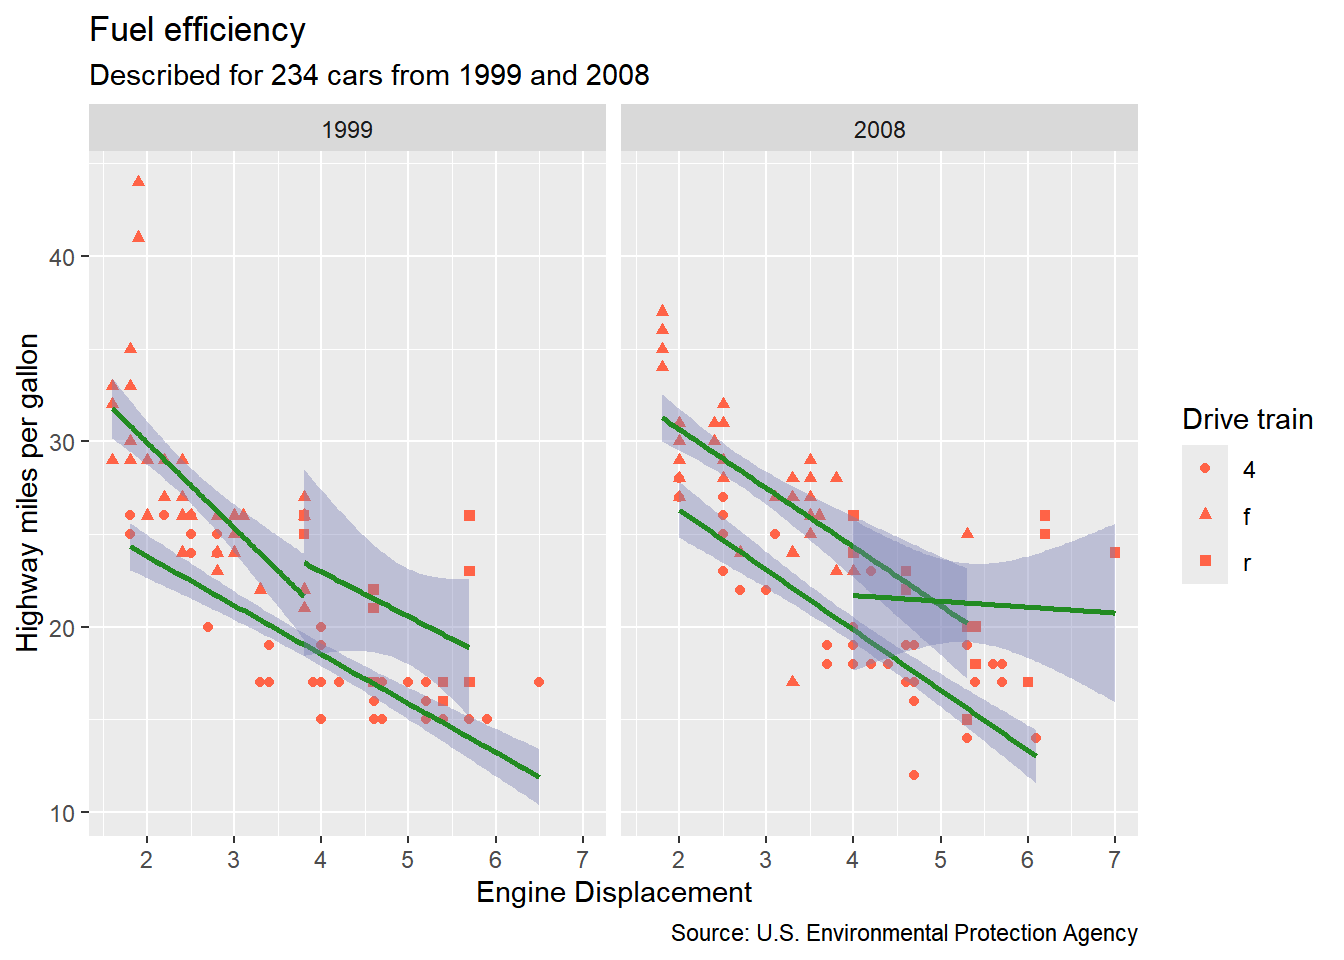
C.3.6 图层-geom = element_geom()
C.3.6.1 图形属性的整体调整
theme()函数中的新参数geom可以用于控制图层的图形属性,主要包括
- Colors:
-
ink:前景色。 -
paper:背景色。常与ink联合使用,使得前景色变暗,并与主题其余部分协调。 -
accent:特殊的颜色选择器。 -
fill和color:可以覆盖任意一个ink,paper和accent的设置。
-
p +
  aes(color = NULL, fill = NULL) + # Resetting aesthetics
  geom_smooth(formula = y ~ x, method = "lm") +
  theme(
    geom = element_geom(
      ink = "tomato",
      paper = "dodgerblue",
      accent = "forestgreen"
    )
  )
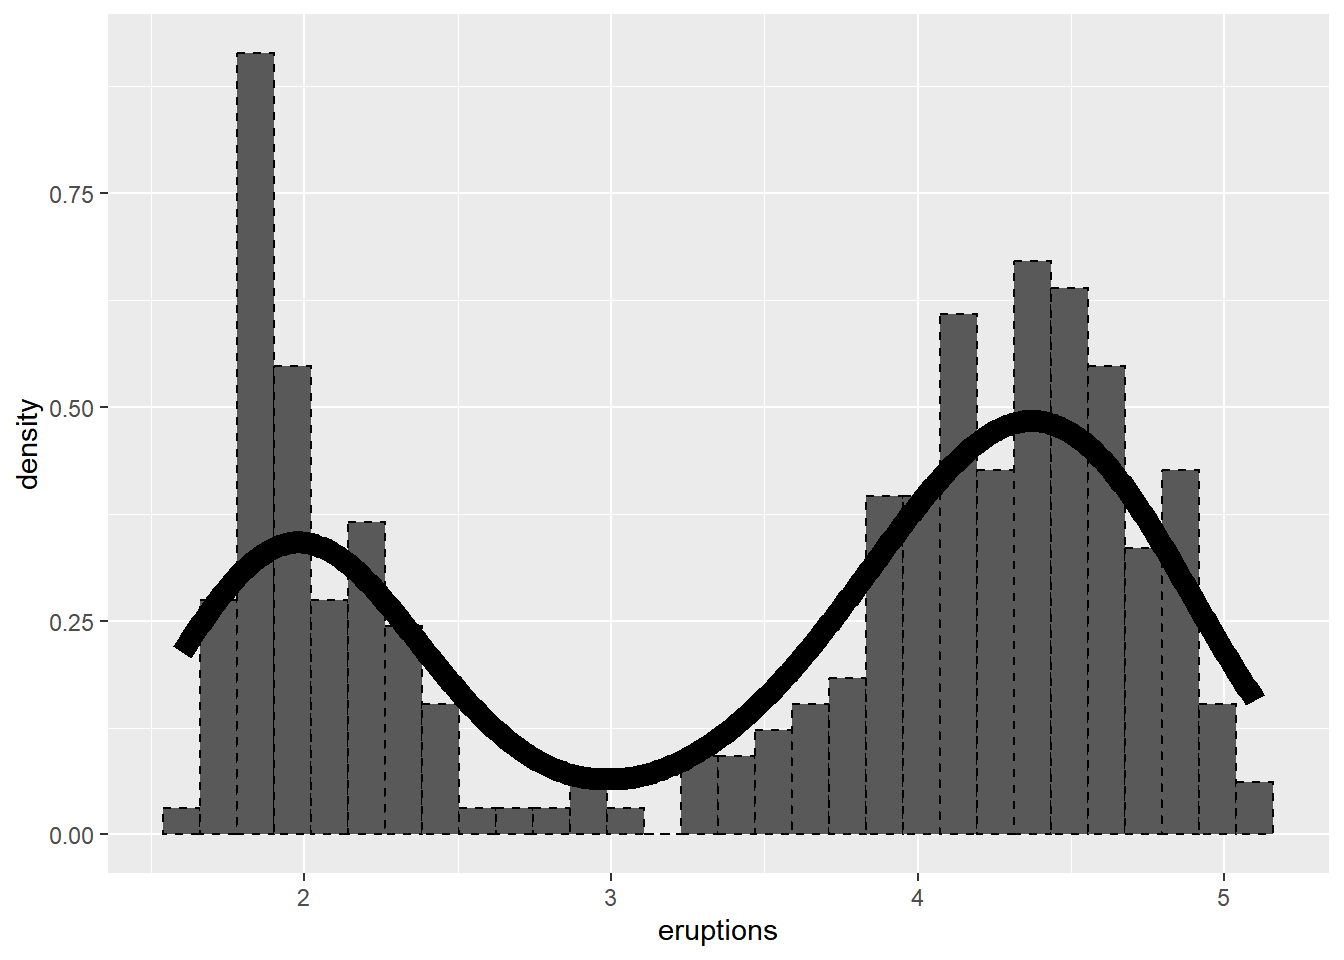
- Lines:
-
linewidth,linetype:控制线条的粗细和样式。 -
borderwidth:用于调整封闭形状(如矩形)的边框线条的粗细。 -
bordertype:用于调整封闭形状(如矩形)的边框线条的样式。
-
ggplot(faithful, aes(eruptions)) +
  geom_histogram(aes(y = after_stat(density)), bins = 30, colour = "black") +
  geom_line(stat = "density") +
  theme(
    geom = element_geom(
      borderwidth = 0.5,
      bordertype = "dashed",
      linewidth = 4,
      linetype = "solid"
    )
  )
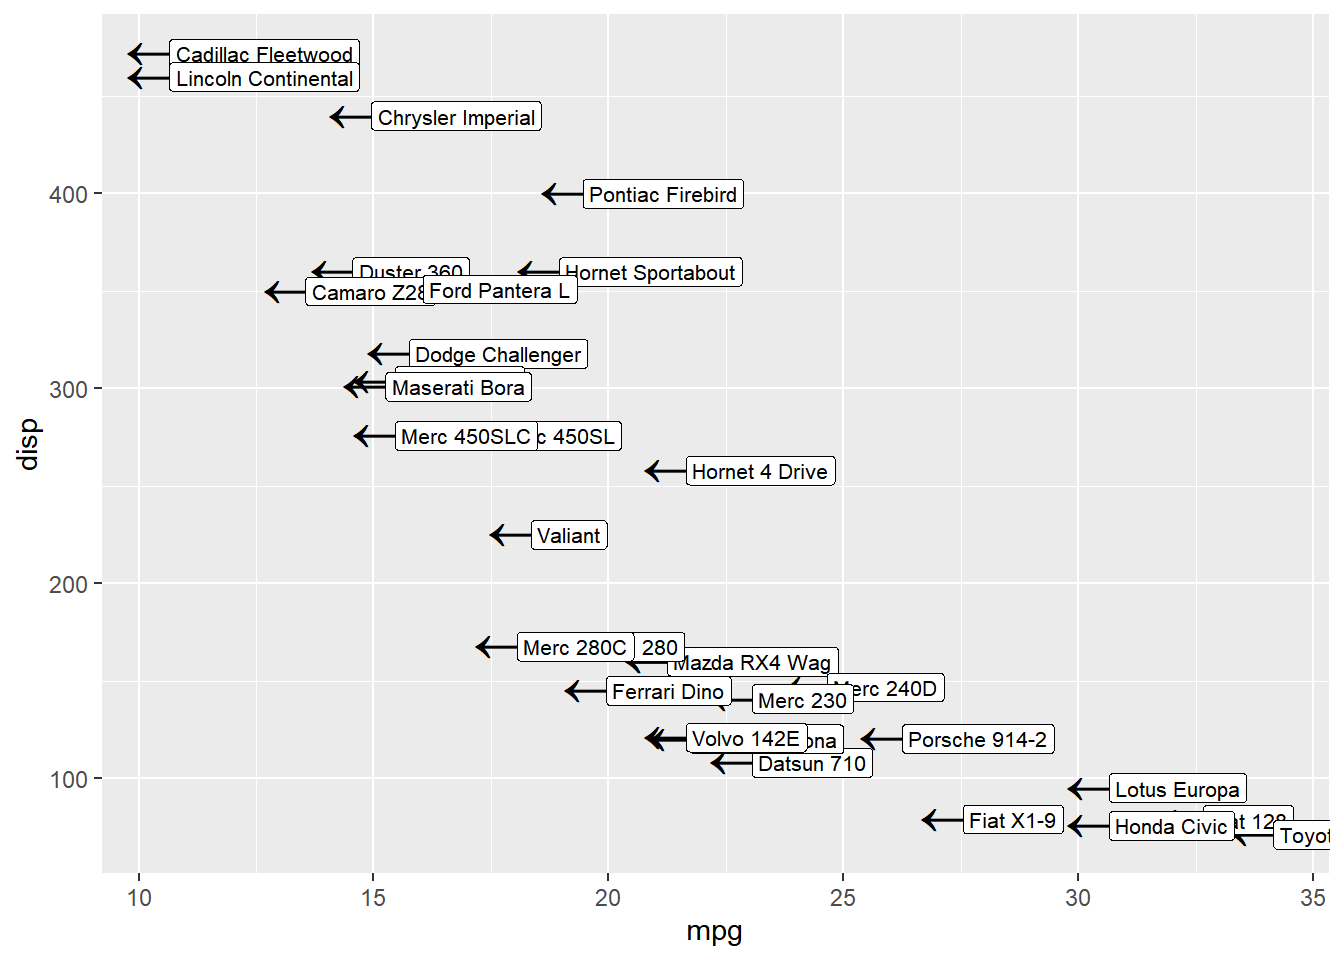
- Points and Text:
-
fontsize,pointsize:用于调整文本和点的大小。 -
pointshape:用于调整点的形状。 -
family:用于调整文本的字体系列。
-
ggplot(mtcars, aes(mpg, disp, label = rownames(mtcars))) +
  geom_point() +
  geom_label(nudge_x = 0.25, hjust = 0) +
  theme(
    geom = element_geom(
      # 调整点的大小和形状
      pointsize = 8,
      pointshape = "←",

      # 调整文本的大小和字体
      fontsize = 8,
      family = "Ink Free"
    )
  )
C.3.6.2 图形属性的精细调整
除了通过geom = element_geom()全局修改图层属性外,还可以通过theme()函数中的其他参数来精细调整特定图层的属性。这里的重点是,通过蛇形命名法,将图层函数变换为点式命名的参数,进而使用element_geom()实现对特定图层属性的控制。
ggplot(mpg, aes(class, displ)) +
  geom_boxplot(outliers = F) +
  geom_jitter() +
  theme(
    geom.boxplot = element_geom(fill = "orchid", color = "turquoise"), # 更改箱线图图层
    geom.point = element_geom(color = "dodgerblue")
  ) # 更改散点图图层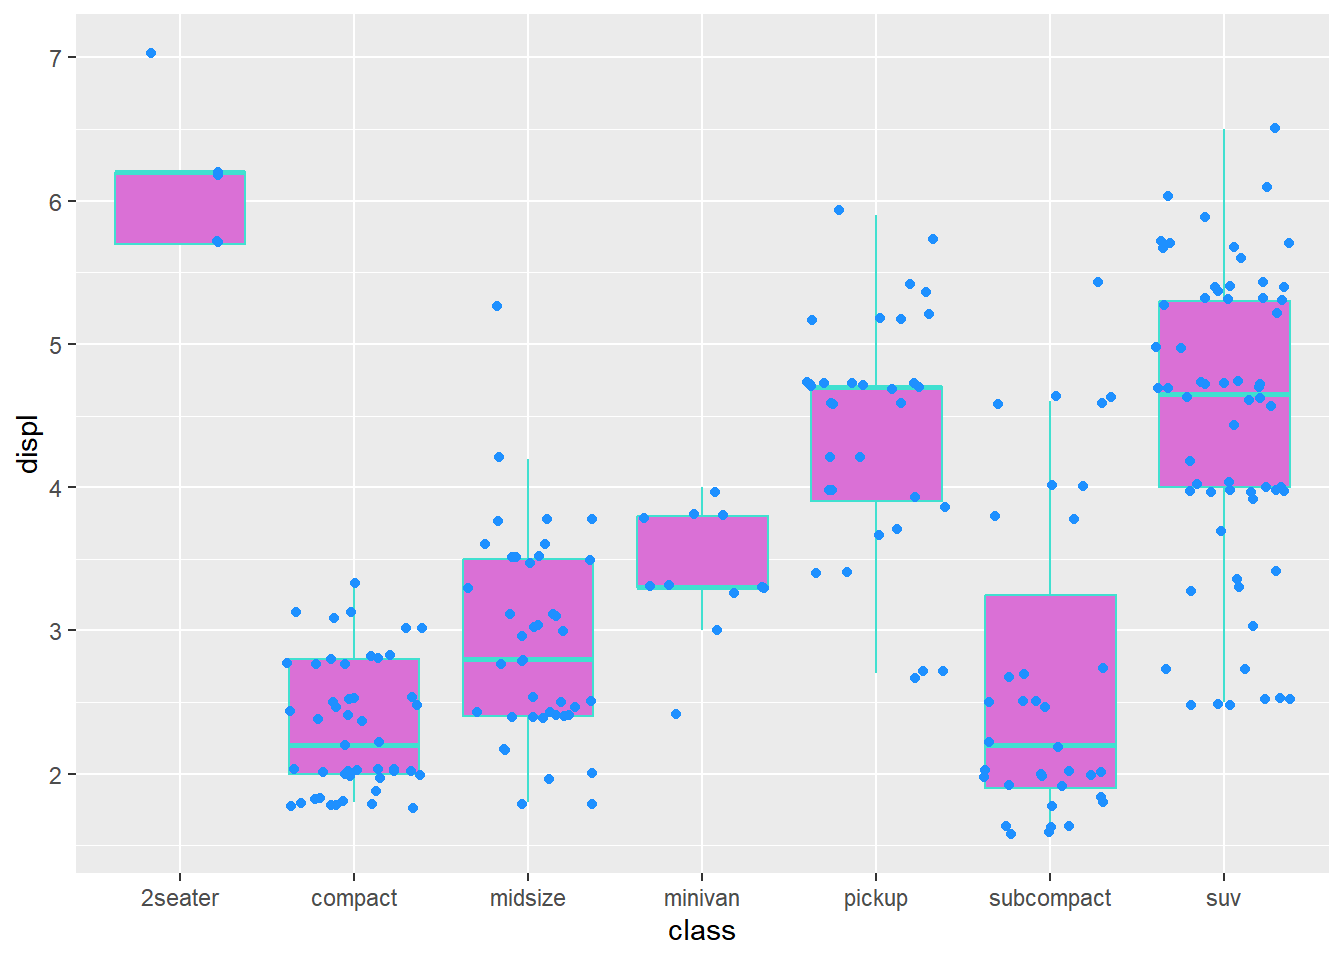
C.4 技巧和窍门
C.4.1 编写自定义全局主题
在编写自定义主题时,有几点需要牢记。核心原则是确保主题设计能够稳健应对上游变更,这就要求我们在自定义主题时,不仅要考虑 ggplot2 可能新增、废弃或重定向的元素,还需兼容扩展程序使用的主题元素。
在以上原则的基础上,自定义主题有以下几个基本的要求:
- 以
function()函数的形式保存自定义主题。 - 使用默认的的主题作为自定义主题的基础,例如
theme_grey()或theme_minimal()等。 - 在自定义主题中,使用
theme()函数来覆盖默认主题的设置。我们可以使用+ theme()或%+replace% theme()来实现覆盖。前者会在默认主题的基础上添加新的设置,而后者则会完全替换默认主题中的相应设置,使用后者时,需要保证element_XX()函数中所有的属性不能为NULL值。
my_custom_theme <- function(...) {
  theme_bw(...) + # 可添加%+replace%
    theme(
      text = element_text(
        family = "",
        face = "plain",
        color = "red",
        size = 11,
        hjust = 0.5,
        vjust = 0.5,
        angle = 0,
        lineheight = 1,
        margin = margin()
      ),
      # Non-root elements can be partially defined
      legend.text = element_text(color = "blue"),
      legend.key.size = unit(1.5, "lines")
    ) +
    theme_sub_panel(
      grid.major = element_line(color = "grey", linetype = "dashed"),
      grid.minor = element_line(linetype = "dotted", color = "grey80")
    )
}

p + my_custom_theme()
C.4.2 设置全局主题-Global theme
避免在整个代码文档中重复键入theme()和相关设置,同时统一整体的绘图风格,我们可以使用set_theme()函数进行主题统一的设置。
如果想撤销全局主题,则可使用
reset_theme_setting()函数。set_theme(my_custom_theme())
p
C.4.3 主题设置打包
有时,我们并不希望对主题进行全面的覆盖,而是希望将一组相关的主题设置打包成一个可重用的单元。例如,我们希望将图例相关的设置打包成一个单独的函数,以便在不同的图表中重复使用。
reset_theme_settings()
bottom_colorbar <- function() {
  theme_sub_legend(
    position = "bottom",
    title.position = "left",
    justification.bottom = "left",
    key.width = unit(1, "null"), # 按照面板空间拉伸颜色条
    margin = margin_part(l = 0, r = 0) # 移除左右边距
  )
}

p +
  aes(shape = NULL) + # Resetting shape aesthetic
  bottom_colorbar()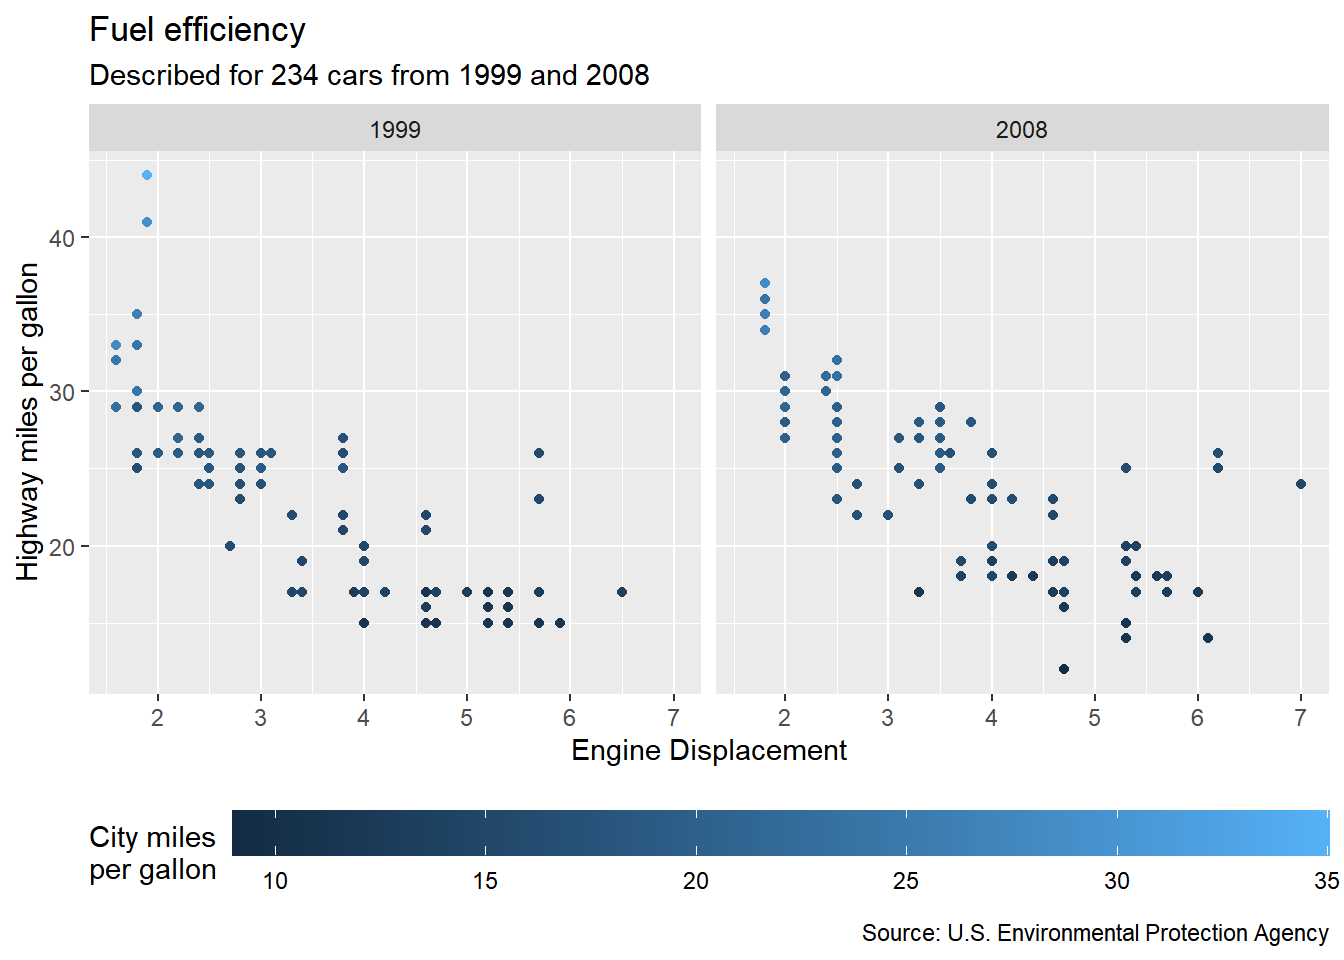
C.5 结语
- ggplot2 extension中有丰富的、已经成型的主题扩展。
-Tidytuesday项目催生了丰富的绘图代码资源库。
- y叔的绘图网站开源了其团队成果的报告、分析和图形代码。